Showing posts with label Bags. Show all posts

Sunday, 5 January 2014

Elvish delight

No not High Elves or Wood Elves (sorry, Middle Earth reference), but Santa's Elves, who have been busy over the last few months preparing Christmas gifts....

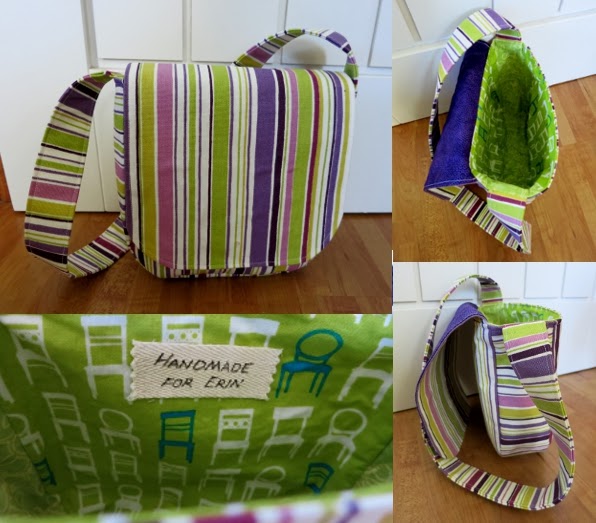
Erin's Bag

A smaller version for my messenger bag (posted here), measures approx 8'' x 8'', all the fabrics are from my stash/left over from other projects.


Hollie's Apron

Made using the tutorial from Aesthetic Nest. One side is made from the last scraps of the Fairy fabric I used for Hollies bunting and bean bag, the other side is a patchwork of scraps left over from her Great-grandmother's quilt.


Christmas Table runners

Made from fabrics in a Moda Jelly roll, Joy by Kate Spain.  The blocks are 5'' x 10'' and the grey borders are all 2'' wide.  Really getting the hang of free motion quilting and machine binding with these ones, delighted with the quality of the finish.


Mum's knitting needle roll

More using of leftover fabrics to make some storage for the family demon knitter, based on this tutorial from Stitch Parade.


Monday, 4 February 2013

Upcycle experiment

I scavenged a pair of trousers that Mal was chucking out and decided to experiment with them - trying to create a tote bag. 

First I cut the legs off just below the crotch, then unpicked the inside seam and laid them flat.  I pinned the waist band, marked out and cut a vaguely square shape -


The base width ended up being about 23', with the height about 16' so I cut out two rectangles from the lining fabric of this size. In the end this was a bit big, especially around the waist band and I had to put pin-tucks in so I might try just using the outer bag as a template the next time.

On the outer I sewed around the sides and a long the bottom, then on the bottom corners to create a base I matched the side and bottom seam and the sewed across the corner (about 4'). I did the same when making the liner.


From the legs I cut 4' strips and joined them to make the bag straps - I did a diagonal join as I think it looks neater.


I think it looks quite good, and it's huge! I can fit loads of books in and with the two wide straps it shouldn't kill my shoulder too much.  As it's from a pair of trousers there are loads of pockets as well.


Sunday, 17 June 2012

Bag v2.0

I can post this up now as it's been delivered! Mum saw my small messenger bag that I made around the end of last year and decided she'd like one.  Not much advice was given on the type of fabric as long as it "wasn't flowery"!

So I had my first ever trip to Calico Laine fabric shop/warehouse near Neston.....Mmmmm fabric.  So much nice stuff and great to see it instead of trying to work out what it would really look like from website pictures.

I went for a lovely purple/indigo/violet/pink/blue swirly pattern fabric in the end, and decided on pale blue as a complimentary colour. I thought going for purple solid colour as the second fabric might be a bit much and hard to match the colour against the pattern.


I didn't alter the design at all from the original one I did. On the whole I'm really happy with the way it turned out..... I'm getting better at using the machine to sew around corners. There were a few places where the fabric gathered or tucked a bit - I'm not sure if that's down to my inexperience or the fact that the machine struggles a bit with the amount of fabric I'm getting it to punch through!

Monday, 12 December 2011

Turned out well in the end...

So following the instructions from Heart of Mary's blog that I linked to in an earlier post, I've made my little messenger bag.

1/2 metre of the flowery fabric from 'The Internet' and a metre of the black fabric from Simon Boyd in Gresford.  Zips and interfacing from Calico Laine, and the magnetic snap from eBay.

I edited slightly from the instructions and added some stitching to create pen pockets on the front of the bag. I also added in loops inside for key fobs.


I did think about making the strap adjustable but decided against it in the end. If I make a larger one, I'll add adjustable straps.


I'm really happy with the way it turned out. The stitching looks OK, even though I was worried about my sewing of the corners and around the inside zip!

Friday, 9 December 2011

How to make a new bag....

While I really love my North Face small messenger bag, it's a bit outdoorsy for general work purposes so I've decided I'd like to make something that fulfills the same purposes but looks a bit more girlie. I've been scouring the internet for patterns for messenger bags an have come across the following tutorials:

A messenger bag with zipped pockets, a magnetic closure, and I'll change it a bit to add an adjustable strap:
http://pinoyinoz.blogspot.com/2008/07/tutorial-messenger-bag-with-zip-top.html

How to add an internal zipped pocket and a magnetic closure: http://sewmamasew.com/blog2/2007/07/tutorial-zippered-and-slip-pocket-tutorial/

And I found this tutorial for a bag that's a little less practical and a little more girlie:
http://creativelittledaisy.typepad.com/creative_little_daisy/2006/01/basic_purse_tut.html