Tuesday, 8 April 2014

Fan girl

Looks like I'm turning into a bit of Deer and Doe fan girl - first there was the Belladone, then the Chardon, and now we have the Sureau.....

I had this grey/blue linen sat around for a few months - I think it came from Abakhan and the plan was always to make this dress and jazz it up with some piping.

Is it a bird? Is it a plane?
I cut a 38 bust and graded it to 40 a the waist and added an inch to the length of the bodice and the fit is not bad (I'm getting better).  It might be a 1/4 inch too long in the bodice now, but meh who's going to notice?!

Oh look, a zip

I didn't do anything fancy with the side zip, just followed the instructions.  They're really easy, the instructions that is, and the dress came together without any head scratching, procrastinating, or the seam ripper.


I *love* the contrast piping, and the wooden heart buttons (found on eBay). I'm so impressed with the finish as well (pats self on back). I tried to not cut corners or rush and it really shows.


And I was even a little OTT on the finish on the inside - every seam is bound.... Well it's linen, it's going to fray like billy'o (although it was fine when I was sewing). 

Possibly a bit too much?

All in all, I love this dress!!! Yay!!!!


Tuesday, 1 April 2014

Slow, slow, quick...

Now usually it takes me ages to finish a quilt, and it sits there for weeks between stages (evidence the half finished Butterfly quilt top, the finished Battenburg quilt top, and the half quilted Wintersmith quilt).  However, the first grandson of my lovely friend and colleague Laura arrived 10 weeks early and I decided that he'd need a quilt to keep him warm!


As I said in this post, this was made from a charm pack of Kate Spain's Daydreams collection for Moda (I'm a little bit of a Kate Spain fan...), and 5 FQs of solid pastel colours - ideal for a baby quilt I thought.

Given I started with the charm pack I decided to keep it simple (and quick), just cutting the FQs into 5'' squares, and then joining everything together to make the quilt 10 squares in both directions.  I didn't think about the placement at all, just divided everything into ten piles then joined everything in each pile to make the rows.


The backing and binding fabrics came from the craft cotton bins at Abakhan. I love the marble blue sparkly one - might have to go back and see if they have any more! For some reason I was being a complete spanner and it took me a few tries to join enough fabric together for the back (rushing, not thinking).

As the design was so simple, the quilting stayed simple as well, just joining the corners of the squares to divide them on the diagonal.  I didn't mark or draw anything at all, doing it all by eye.


Monday, 31 March 2014

Two for one

What everyone needs in their life is a skirt with sharks on it… After being unsuccessful at finding that Lobster fabric everyone has been blogging about, I gave up and resorted to this Boden Sharks and Divers fabric that I found on eBay.  It’s cotton, but quite a heavy weight and a bit stiff – and it also resists pins (or they leave marks).  I've had the Deer and Doe Chardon skirt pattern for ages so I decided to give it a go with this fabric.


I traced between two sizes (38 and 40) to give me more room at the waist, and went with the standard length.  I decided that this was to be a winter skirt so I lined it with some leftover lightweight cotton (from my Tova top), by just cutting out the front and back pieces again.  I joined the outer, lining and waist band together at the top but in hindsight I think this was a bit of a faux pas as there ended up being a lot of fabric at the waist.  What I should have done (and will do next time!) is join the lining to the bottom of the waistband and then the  top of waistband to the outer (as per the design).


The zip went in without problems, except I stitched too close to the teeth and then couldn't get it undone!  After redoing that it went fine, and I hand stitched the lining to the zip on the inside.  It’s not my finest work but who’s going to see the inside anyway?!

I’m not great at predicting what items will look like, and if they'll suit me but I have to say I love this skirt! It actually makes me look like I have a waist and hips J  But then I realised that with such a high waist (nothing like all the other items in my wardrobe), I had absolutely nothing to wear with it…. So I had to make another Sewaholic Renfrew top!


This is my second Renfrew – unlike the first it has full length sleeves, and I shortened it significantly (about 4’’) so that it just sits on my waist.  The front/back pieces I shortened to the line on the pattern that’s marked for where you add/remove length, then worked out the difference between this width and the original width to subtract that from the waistband piece.  All worked out well I think.  The fabric is some ponte roma that I picked up on eBay (hmmm, bit of a trend with this post).  Question is, how long can I manage to keep it white?!


Sunday, 23 March 2014

A quilt a day...

I only started cutting the fabric yesterday afternoon!! Amazed at how quickly it's come together, although it is a charm pack of Kate Spain's Daydream collection for Moda (along with 5 FQs of matching solids from http://www.simplysolids.co.uk/so a little cheating!!


To maximise the fabric used I just went for a simple 10x10 patchwork, ending up with a quit just under 4' square.

More pictures to follow (in daylight, not with phone camera)!

Just needs a name now...

Tuesday, 18 March 2014

Striped bats

I know I haven't blogged anything for ages so there’s a huge backlog of stuff to show.  I was really good a couple of weeks back and had a blitz on the outstanding sewing items – I really should do the same here! So in no particular order….

Here’s my Named Blair batwing shirt.  This was a labour of love really, the fabric is really really light jersey (Viscose stretch from Minerva) and significantly different to only other jersey I've used (for my as yet unblogged Named Dakota dress and Sewaholic Renfrew top).  I didn't realise it would be such a pain to sew – or cut! Trying to cut it out the fabric was moving about so much I ended up cutting each piece individually rather than folding the fabric over, and next time I'm definitely going to break out the rotary cutter…


Construction is pretty easy, only the front, back and two sleeves so it comes together really quickly and I stabilised the shoulder seems with a bit of leftover cotton selvage.  I did sort of try to match up the stripes on the front/back but it wasn't really going to work for the sleeves.


I got a twin needle to try out…. I did a few practise runs on scraps and then tried around the neck line.  I don’t know what happened but it chewed up the fabric (too light maybe? I was even using my walking foot!) and I had to unpick half a dozen times. Eventually I gave up and just put in a single row of stitches.


So given all that, I’m not really impressed with my finish on the top. However I love the loose floatiness of it, and it’s definitely something I’ll wear in the summer over vest tops.  I’d like to make another in a slightly heavier fabric, but the trauma is blocking the inspiration at the moment…..

Friday, 31 January 2014

Stormy seas

I'm in the process of creating a permanent sewing space in the snug at the moment.  Usually I would be sewing on the dining room table but with Mal at home more often now its a bit unfair, so I've engineered a space in the snug with some furniture moving.  The snug feels a bit empty and echos even though its such a tiny room, so it needs padding out with soft furnishings, and now my machine has a home I decided I need a mat.  My favourite quilt from last year was Oceania and I had some triangles left over so made this:


It's a generous size to fit my machine on, and I'm going to use a double layer of wadding to help deaden the machine noise.  I've also got loads of half triangles from the end of the strips that I cut the triangles from.  I've sewn them all together to make little rectangles, but I don't know what I'm going to use them for - they're only 2'' by 3.5''. Any ideas?


Linking up to Needle and Thread Thursday with Kelly

Monday, 27 January 2014

Distraction

I know I should be finishing Wintersmith, but the draw of the next project was too strong (again - and I have the house to myself for a few days so can drape fabric everywhere)...

When I designed/made the Papillon quilt I intentionally only used half of the patterned fabric so that I would have enough left over to make a charity quilt.  The plan originally was to make something very similar, so I cut all of the fabric into 3.5'' squares.  But I have another idea...  I want to do a kind of pixelated look, with darker colours from the bottom right, and getting lighter towards the top left.

This is my first layout.


I've taken the photo then greyscaled it and blurred it to see if it would give the effect I wanted:


I think from these two images, I can see a couple of squares that I want to re-position (brightest pink in top half to be moved down). I'll leave it for a few days and think about it as well!

Sunday, 5 January 2014

Elvish delight

No not High Elves or Wood Elves (sorry, Middle Earth reference), but Santa's Elves, who have been busy over the last few months preparing Christmas gifts....

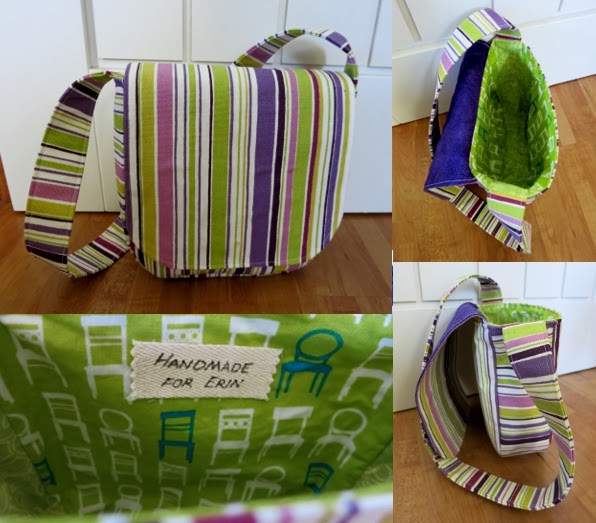
Erin's Bag

A smaller version for my messenger bag (posted here), measures approx 8'' x 8'', all the fabrics are from my stash/left over from other projects.


Hollie's Apron

Made using the tutorial from Aesthetic Nest. One side is made from the last scraps of the Fairy fabric I used for Hollies bunting and bean bag, the other side is a patchwork of scraps left over from her Great-grandmother's quilt.


Christmas Table runners

Made from fabrics in a Moda Jelly roll, Joy by Kate Spain.  The blocks are 5'' x 10'' and the grey borders are all 2'' wide.  Really getting the hang of free motion quilting and machine binding with these ones, delighted with the quality of the finish.


Mum's knitting needle roll

More using of leftover fabrics to make some storage for the family demon knitter, based on this tutorial from Stitch Parade.


Friday, 3 January 2014

The quilts of 2013

Looking back on my first year of quilting, I'm so chuffed with how far I've come and what I've achieved.  There's been so much learning going on! I've really enjoyed the process and hope to continue develop my skills into 2014.  Here's the lowdown on what's been happening....


1. Baby Bleakley quilt - my first ever quilt (technically it's from 2012 but meh), so many things there I can do better now! Why I decided HSTs would be a good place to start I don't know, but they matched up really well.  It was here I learnt that it's much easier if you make the backing at least a couple of inches bigger than the quilt top.
2. Granny quilt - big blocks make a quick quilt! My biggest love with this quilt is the matching cushion (pillow) - I love the texture that the closely quilted lines give.
3. Oceania quilt - first try of equilateral triangles, and they matched up pretty well. The colours on this quilt are my favourite for the year.  I hand stitched the binding down and then went over it with a fancy stitch on my machine and it gave a great texture.
4. Christmas table runners - second free motion quilting attempt, starting to get the hang of it now! Also tried machine stitching the binding down and found that if you hand tack the corners first you get a much better finish.
5. Snowy Owl quilt - love the texture of the lines, but all those corners took forever to quilt!
6. Joseph quilt - love, love, love the bright batik jelly roll strips, and the pieced back, and the slightly wonky spiral... My favourite quilt of the year!
7. Papillon quilt - first attempt at free motion quilting and I did lots of looping and squiggles. Turned out really well with great texture and not too stiff, but I thinking I prefer my quilting more widely spaced.  However the pink and grey were a fantastic colour combination.

These were all given away as gifts... But hopefully for 2014 I might actually finish a quilt for me (there are a couple of quilt tops around that I'm planning to keep hold of)!!

Belonging

It's important for a quilt to know who it belongs to.....

I've been experimenting with labels on my quilts as I've been going along.  My first attempt at hand embroidery didn't go well so I tried writing them with a fabric pen.  This was better, but I still wasn't convinced.

My sewing machine has a number of embroidery settings and after getting a hoop for it for my birthday I gave that a go as well. The results look very impressive, but the satin stitch is a bit big and grand for my quilt labels!

Ages ago the lovely Moira at Kettleboiler sent me some t-shirt transfer paper to try, after I commented on some ace labels she made for clothes.

Well I've finally got around to it.....


Not bad for a first attempt I say, I just need to experiment with the space and borders.  My favorite is the label for Oceania, there's 1/2" of white around the text and 1 1/2" patterned fabric border.  If I was really organised I'd sew these on the backing of my quilts (like Kelly suggests in her tutorial), but as I'm not I'll have to hand sew them on!


I also made some smaller labels for other gifts using some cotton webbing, and a couple of practice 'brand' ones.... (more on that another time).