Sunday, 5 January 2014

Elvish delight

No not High Elves or Wood Elves (sorry, Middle Earth reference), but Santa's Elves, who have been busy over the last few months preparing Christmas gifts....

Erin's Bag

A smaller version for my messenger bag (posted here), measures approx 8'' x 8'', all the fabrics are from my stash/left over from other projects.


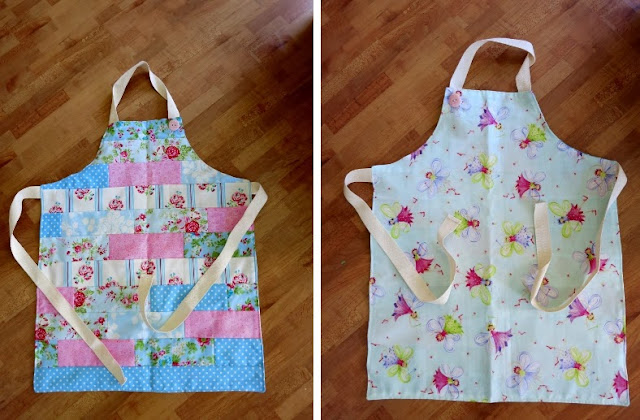
Hollie's Apron

Made using the tutorial from Aesthetic Nest. One side is made from the last scraps of the Fairy fabric I used for Hollies bunting and bean bag, the other side is a patchwork of scraps left over from her Great-grandmother's quilt.


Christmas Table runners

Made from fabrics in a Moda Jelly roll, Joy by Kate Spain.  The blocks are 5'' x 10'' and the grey borders are all 2'' wide.  Really getting the hang of free motion quilting and machine binding with these ones, delighted with the quality of the finish.


Mum's knitting needle roll

More using of leftover fabrics to make some storage for the family demon knitter, based on this tutorial from Stitch Parade.


Friday, 3 January 2014

The quilts of 2013

Looking back on my first year of quilting, I'm so chuffed with how far I've come and what I've achieved.  There's been so much learning going on! I've really enjoyed the process and hope to continue develop my skills into 2014.  Here's the lowdown on what's been happening....


1. Baby Bleakley quilt - my first ever quilt (technically it's from 2012 but meh), so many things there I can do better now! Why I decided HSTs would be a good place to start I don't know, but they matched up really well.  It was here I learnt that it's much easier if you make the backing at least a couple of inches bigger than the quilt top.
2. Granny quilt - big blocks make a quick quilt! My biggest love with this quilt is the matching cushion (pillow) - I love the texture that the closely quilted lines give.
3. Oceania quilt - first try of equilateral triangles, and they matched up pretty well. The colours on this quilt are my favourite for the year.  I hand stitched the binding down and then went over it with a fancy stitch on my machine and it gave a great texture.
4. Christmas table runners - second free motion quilting attempt, starting to get the hang of it now! Also tried machine stitching the binding down and found that if you hand tack the corners first you get a much better finish.
5. Snowy Owl quilt - love the texture of the lines, but all those corners took forever to quilt!
6. Joseph quilt - love, love, love the bright batik jelly roll strips, and the pieced back, and the slightly wonky spiral... My favourite quilt of the year!
7. Papillon quilt - first attempt at free motion quilting and I did lots of looping and squiggles. Turned out really well with great texture and not too stiff, but I thinking I prefer my quilting more widely spaced.  However the pink and grey were a fantastic colour combination.

These were all given away as gifts... But hopefully for 2014 I might actually finish a quilt for me (there are a couple of quilt tops around that I'm planning to keep hold of)!!

Belonging

It's important for a quilt to know who it belongs to.....

I've been experimenting with labels on my quilts as I've been going along.  My first attempt at hand embroidery didn't go well so I tried writing them with a fabric pen.  This was better, but I still wasn't convinced.

My sewing machine has a number of embroidery settings and after getting a hoop for it for my birthday I gave that a go as well. The results look very impressive, but the satin stitch is a bit big and grand for my quilt labels!

Ages ago the lovely Moira at Kettleboiler sent me some t-shirt transfer paper to try, after I commented on some ace labels she made for clothes.

Well I've finally got around to it.....


Not bad for a first attempt I say, I just need to experiment with the space and borders.  My favorite is the label for Oceania, there's 1/2" of white around the text and 1 1/2" patterned fabric border.  If I was really organised I'd sew these on the backing of my quilts (like Kelly suggests in her tutorial), but as I'm not I'll have to hand sew them on!


I also made some smaller labels for other gifts using some cotton webbing, and a couple of practice 'brand' ones.... (more on that another time).

Thursday, 12 December 2013

Jelly rolls are evil

It sat there taunting me for a week, then I gave in and opened it.....

Whilst in Newcastle with work a few weeks back, I found a proper Quilting shop! It's not really something I'm used to as there isn't one on North Wales, so most of my fabric purchasing takes place on the interweb.  It was lovely to browse, chat and drink tea with the ladies at Just Quilting. In the end I bought a couple of FQ bundles and a jelly roll of Moda Winter's Lane.  My usual fabric buying is planned for specific projects, but these were completely spur of the moment (for the stash, you understand!).


However, once I was home and the jelly roll was sitting there on the sideboard, it was just calling to me.... I resisted for a while, but then I ran out of thread for Christmas pressies I was quilting, and came across this jelly roll idea on pinterest so it just had to be opened!


So I took the entire jelly roll  sewed 5 contrasting strips together, then cut these into 10.5' squares (you can follow the rest on the link, I don't have WIP pictures....).  Finished size for this is 3'3'' by 4'4''.  

I also ordered some Bella Solid in Cherry and extra of one of the blue patterned fabrics from the collection (from Hulu Crafts) to make borders for the quilt top.  The plan is to do a 1' red border, and then outside of that a 3'' patterned border. 


Now it just needs a name.... At the moment I'm leaning towards "Wintersmith", as I'm reading the book, and ever since I heard it on the radio I have Steeleye Span's Dark Morris song in my head.


Linking up to Kelly's Needle and Thread Thursday


Wednesday, 20 November 2013

Back in the room...

I don't know where I've been but it hasn't been here.... I've got a list of makes to blog about but with the nights drawing in I just haven't had the chance to take decent outside photos of them.  All that darkness and 'weather' has got me feeling blue tonight - I got Piglet's fork serviced a few weeks back (and got told off by Nick the Bike Mechanic for the state it was it) and was hoping to get out tonight and test its bounce, but it's proper miserable howling gale/pouring rain so I decided a ride in the woods wasn't the best idea.

So here's a couple of things I've been working on in the last few weeks....

Autumn Table runner - made with a Moda Dancing in the Rain batik charm pack, with disappearing nine patch patchwork, black binding, and..... My first attempt at free motion quilting!! I did a small swirly pattern with some copper coloured variegated thread.  Usually I hand sew my binding down, but this time I tried using the machine and it worked fine (much much quicker than hand sewing!).

I love this shot, doesn't the quilting look to die for!!

Sorry, I'm useless at taking photos in artificial light (the colours are a bit squiffy)
Next up is Papillon (a Christmas WIP). The patterned fabric is a FQ pack that I bought randomly in my big order from The Fat Quarter Shop (US) earlier in the year, and the grey is just unbranded quilting fabric from Abakhan. The squares are 3.5''.  You can see I've started my second attempt at swirly free motion quilting with some pink variegated thread on the grey bits.  I'm going to do some kind of straight line quilting on the patterned fabric in a grey thread.

I never used to be a pink person but I love this colour combination!


And finally.... Left over fabric from a jelly roll of Kate Spain's Joy collection for Moda (I think) went into a Plus patchwork Christmas table runner.  The rest of the jelly roll made two sets of table mats.  More practice at swirly quilting, this time with bigger loops.  Just need to bind this (probably with some left over grey fabric), then it's done!


Linking up to Lee at Freshly Pieced for WIP Wednesday!

Friday, 27 September 2013

The one where Piglet meets the Peloton

I've been distracted by sewing and gardening and have got a bit behind with the blogging.  Last week was the Tour of Britain and as a stage was going through North Wales it seemed rude not to go and watch.  I was even organised enough to book the day off work.

I had a number of conversations with work colleagues (who were involved with the planning) about the best places to watch. I could have walked into the village to watch them whizz past but that didn't seem very exciting, and I couldn't really be bothered to drive over to Llanberis to watch the last climb or the finish.  

So I decided to go and watch the climb over the Clwyd Gate - the pass over the Clwyds that descends into Ruthin. Even though it wasn't a 'King of the Mountain' section I thought there would be a better view than on the flat.  And as I had the day off work it seemed rude not to go out on my bike, so Piglet and I cycled cross -country from Cilcain - on the easy trails, I have no fitness at the moment....

Piglet bike admires the view

We even managed to find some singletrack (it was a very short section though)

So I rocked up just below the Pass about 45mins before they were due, and there were a few people hanging around (and a Wiggo banner!).  Then we spent the next 40 minutes cheering and waving at every race vehicle that went past - official cars, all the police motorbikes, police cars, press cars.... Most gave a wave back, and loads of the motorbikes gave us a flash of blues and twos!


Eventually the official Race car went through and they slowed down to announce more details about the lead group, peloton and the distance between them, and more importantly - where Bradley was... The number/frequency of police vehicles increased until it was clear that the road was closed, then we saw a group of cyclists in the distance....

The Leaders approach

Lead group
Lead group heads up the hill

A few minutes after the lead group went through, we saw the peloton approaching with Team Sky leading the pack in their distinctive black and blue.


Cue lots of frantic waving and shouting from the crowd, and we even got our glimpse of Sir Wiggo (third rider in the photo with gold jersey under his black Sky gillet).

After the riders had all whizzed past, everyone packed up and went home (or to the pub).  It was amazing how everyone disappeared so quickly - it was like it never happened!


Sunday, 15 September 2013

Bella One

 I bought some lovely summer cotton lawn during my visit to Goldhawk Road and the plan was always to use it to make a Belladone (from Deer & Doe) but I as this was my first time making a dress I decided to make a muslin.  I got this fabric from Abakhan bargain bins and I had a plan for it, but I can't remember what...

I'm not really sure that I like the fabric, but I was very impressed with how easily this came together. Most of it was done last Sunday, but I didn't have a zip and ran out of bias tape for the neck so I didn't finish at the time.

This was the first time that I graded a pattern as well, I cut a EU 38 at the bust and hip but graded it out at the waist, and it worked! The fit is pretty good, and everything still fitted together!

The zip was another first, it's an invisible one (and I used an invisible zipper foot) and with help from the Colette Tutorial I managed to fit it pretty well. I even managed to get the waistband on either side almost level!


Saturday, 14 September 2013

Technicolour dreams

I finally got around to finishing the binding on Joseph, and today was actually sunny so I managed to get some pictures outside.  Although by the time I'd finished gardening (digging up the onions and garlic) and tidied up, the sun was low in the sky so there's some interesting shadows going on!

This is a jelly roll of Moda's Eat Your Fruits and Veggies batiks, sewn together in a very simple strip quilt.  I used the whole jelly roll and the quilt ended up being 61'' x 51''.


I quilted it with brightly coloured variegated thread, and the spiral was kinda free motion - I had my walking foot on the machine with the guide bar but I ended up doing it by eye, and the lines are 2.5 to 3'' apart.  The start was a bit wonky, but I'm not fussed about that as it was a first attempt!


The back of the quilt has a pieced star (one inside the other, I'm sure that has a name but I don't know what it is!) and all the fabrics are from the bargain bins at Abakhan.  I used the mottled black fabric seen here framing the start, as the binding as well.


I love how it's turned out - loud and vibrant with no subtlety!  And it's just the right size for curling up on the sofa on a dark winter night....


Monday, 2 September 2013

Path #2

I have this humongous plan in my head that one day the whole lawn area will be surrounded by an edge that you can mow up to with the tractor and not need a strimmer or smaller lawn mower for any of it!

The garden had no paths through the lawn when we moved in, and in the first year Mal built the first path, so I can get to the shed without getting muddy! 

Second year was the year of the polytunnel.

This year, we have the start of the edging path.

There was lots of debate on materials.  Path #1 is paving slabs of indian sandstone - but that was too much for this smaller path.  Then there were bricks - but they were too deep.  So we have brick pavers - in a selection of three sizes, and a rustic look.


So if you have a really hard working OH with 4 days off work, you get a significant amount of path complete.  Including cutting turf, digging out, carrying through gravel for the base and bricks, and laying it all....


There was a fair bit of fiddling to get the curve right, but it turned out right in the end.

I just need to crack on now - dig up and divide the geranium, possibly move the hydrangea, and try and get rid of some of the horsetail....


Sunday, 1 September 2013

Sweety time

I was amazingly super organised and managed to get myself registered on the Sweet Pouch Swap organised by Alyce at Blossom Heart Quilts... My first swap ever! Major excited and a little bit apprehensive!

Talking to my swap partner Monique (in New Hampshire, USA) about what she likes doing and what kind of pouch would be useful, I decided on a box bag - and had already saved this tutorial from Truly Myrtle in my pinterest board.

So then I had to decide on what fabric (from my very small stash), what size, and what patchwork/quilty design.  This obviously required a large mug of tea and some Cadbury's Chocolate Buttons (and I was doing Mathilde blouse things at the same time - hence the freezer paper hanging around....)

Design process

I embellished the box bag design from the tutorial as I wanted to quilt the outside to give it some padding, but then I wanted to line it as well and put a pocket in.  So first things first, to the outside and the patchwork panels....


In my freeform, see what happens design process I ended up not needing the rectangles of fabric at the ends as they disappeared into the corners of the box... but hey, never mind.

So I ended up with a rectangle of patchworked fabric that needed quilting.  I found a lovely box bag with the same patchwork style sides (this one from Spoonful of Sugar.) that just had straight line quilting - so I copied that :-)


For the pocket on the inside, I just wanted a side slip in pocket, which was an issue as the tutorial just uses a rectangle of fabric for the lining and there is no bottom seam to sew the pocket into.  So what I did was make the outside of the pocket as a little piece of quilting and then enclose the top and bottom edges in satin bias tape (luckily the lining/pocket fabric and bias tape were both left over from making my Sorbetto top, so they matched nicely!).  Then I worked out on my rectangle of lining fabric where the bottom edge would be and sewed over the bias tape again to attach the pocket to the lining.  I also tacked the sides of the pocket to the lining, but this stitching disappeared when I created the corners of the box.


I then followed the tutorial to make the box bag, with a fair amount of complaining about the thickness of the quilted outer!  I think if I was to make another quilted box bag I wouldn't bother with the lining - checking a few other tutorials (after the fact), it looks like most people don't bother.  But if you've read any of my dressmaking posts, you'll see that I don't like having the fabric edges exposed!


There was a fair bit of unpicking and re-sewing to get the seams right around the end of the zip, and the corners just because of the thickness of the fabric.  But in the end I got to a finish that I was happy with.

I didn't put any interfacing on the lining fabric as I thought it was robust enough anyway with the quilted outer, but it turns out that wasn't the best idea as the lining kinda flopped and didn't hold the box shape. So to remedy that I hand sewed the lining to the outer on the edges of the box and into the corners.

I did sort of try to line up the birds on either side of the zip.  It almost worked as well!


So after all of that sewing I needed a reward, and what better excuse for a trip to the sweet shop.  Monique had said she couldn't do dairy, which meant I had to visit the best chocolate shop in Britain to get some of the milk free good stuff (and some chilli chocolate for me, I needed the sustenance you understand). Whilst in Chester I picked up some other sweeties from the traditional sweet shop (the ones that have sweets in glass jars, and they weigh them out and put them in paper bags), bit touristy I know, but it is Chester.  Of course, no sweet pouch from Britain would be complete without a packet of parma violets and love hearts..... Did you know parma violets have been around since the 1930's?! 


And yesterday, I got my pouch from Monique! Doesn't it look cute?! I love the pleats, and the colours, and the zip pull, and I've even got a matching pin cushion....